In today's world, having a personal blog is a must - you can blog about your experiences, your technical journeys or even food. If you're a hacker, your blog needs to be built using Jekyll and you'll learn why.
Why Jekyll?
First things first.
Jekyll is a blogging platform built on Ruby. It allows you to write simple Markdown files, while at the same time sports a beautiful templating language which ensures speed when composing and allows endless customization.
Jekyll is based on Git for versioning and can be freely hosted using GitHub Pages

Setting things up
Create your project
You can either create a completely empty Jekyll blog, or you can clone your existing repo from GitHub or elsewhere into SourceLair.
Jekyll padawan
If you don't have a Jekyll blog already, then you can just get our pre-made Blueprint here and get started with a single click.
Already a Jekyll blogger
If you already have a Jekyll blog, you'll just need to clone it in SourceLair and use the HTML project type. It's that easy.
Install Jekyll
Since our HTML project does not have Jekyll pre-installed, all you have to do is type the following command in your fully-featured Linux Terminal:
gem install jekyll
Now, type the following command to build your blog and make it rebuild on change.
jekyll build --watch
Configure your SourceLair project
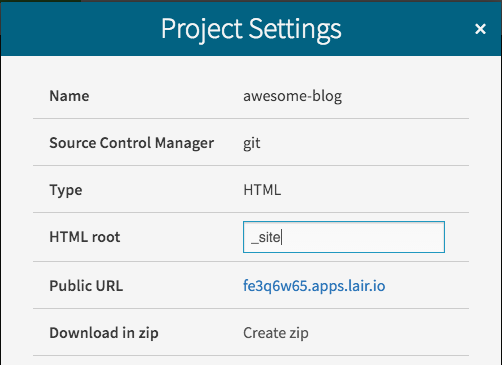
The last step is to set your SourceLair project to look for files in the _site directory, where Jekyll saves them by default. Open your project settings - using the gear icon next to your project's name - and add _site into the HTML root field.

Preview your blog!
Your blog is ready now, don't miss the chance and check it out. In SourceLair, your projects get a unique public URL which allows you to easily preview them or share them with friends and colleagues. Just click the eye-like icon in the sidebar to open it!
From padawan to Jedi
Up until here, everything feels like normal for anyone who has used Jekyll before - except that every single part of it is easier. Let's get to the "Jedi" part.
Preview your website next to your editor
If you don’t like switching windows you can use SourceLair's Split View by opening your _site/index.html file and either clicking on the Preview button or using the Ctrl + Enter (or Cmd on a Mac) shortcut.
The road to heaven
Just previewing your built files was not that exciting, given that you should not mess with your built files in Jekyll. There is another goodie though, which we released recently and is called "Pinned preview pane".
Using the pin button in your preview pane, you can navigate to the page you're editing and pin it there. Then, you can open the Markdown file you like to edit and start playing around. You'll notice that the preview pane will automatically change when you click save with the new built file - bliss.
This will greatly speed up and enhance your workflow, try it out and you'll never want to go back afterwards.
Deploying to GitHub Pages
Your first blog is ready, your workflow is lightning fast, but a blog is nothing unless it's shared with the world. GitHub provides a free Jekyll blog hosting, which will allow you to easily deploy your blog from SourceLair.
Set your blog's base URL for GitHub pages
Commit your work
Before deploying your blog, you'll first need to commit any changes you've made. Press the checkmark icon in the sidebar and type in your favorite message.
Add your GitHub remote
If you don't have a GitHub repo yet, create one and make sure it's named username.github.io, adding your GitHub username. Then copy your GitHub ssh URL (it should be something like [email protected]:username/username.github.io), create a new remote in SourceLair by opening the Command Palette and typing new remote. Name your remote origin to be the default one and paste the URL you just copied.
Deploy
Deploying is as easy as hitting a button. Press the upright arrow in the sidebar which will push your code to GitHub. Then, visit your blog's URL which should be in the form: username.github.io
It simply can't be easier than that!
