
Start your WordPress website
Introduction
This guide is going to help you start developing your Wordpress websites at SourceLair and make the most out of SourceLair's capabilities.
This guide assumes that you already have a SourceLair account.
Setup
Wordpress is based on the PHP programming language and the MySQL database. Respectively, in SourceLair, you have to start a new PHP project with a MySQL database on it. You can do this by starting a new project "From scratch", then choosing the option to create a "Custom" project, writing your project's name and selecting PHP as your language and MySQL as your database.
Note: In case you have already started a new PHP project, you can open your project settings (the gear icon next to your project's name) and add a MySQL database from the "Databases" dropdown menu.
Download WordPress
Following the official WordPress installation instructions, you need to run the following commands in your terminal:
wget https://wordpress.org/latest.tar.gz
tar -xzvf latest.tar.gz
Change root
By default your development server looks for a PHP file called index.php in your project's root folder (/mnt/project/). We need to change it in order to look inside the wordpress folder. We can do it by creating a .env file and adding there the appropriate value for SL_PHP_ROOT environment variable:
$ echo SL_PHP_ROOT='wordpress/' > .env
Then, it's a good practice to add the .env file to .gitignore in order not to push this variable to production:
$ echo .env > .gitignore
After changing your PHP root, your server is going to restart in order to display the new root. Now you can open your Public URL either by opening Command Palette (Ctrl/Cmd + Shift + P) and choosing the Server: Open Public URL command or using the eye icon at the left sidebar of the IDE.
Following the Wordpress installation
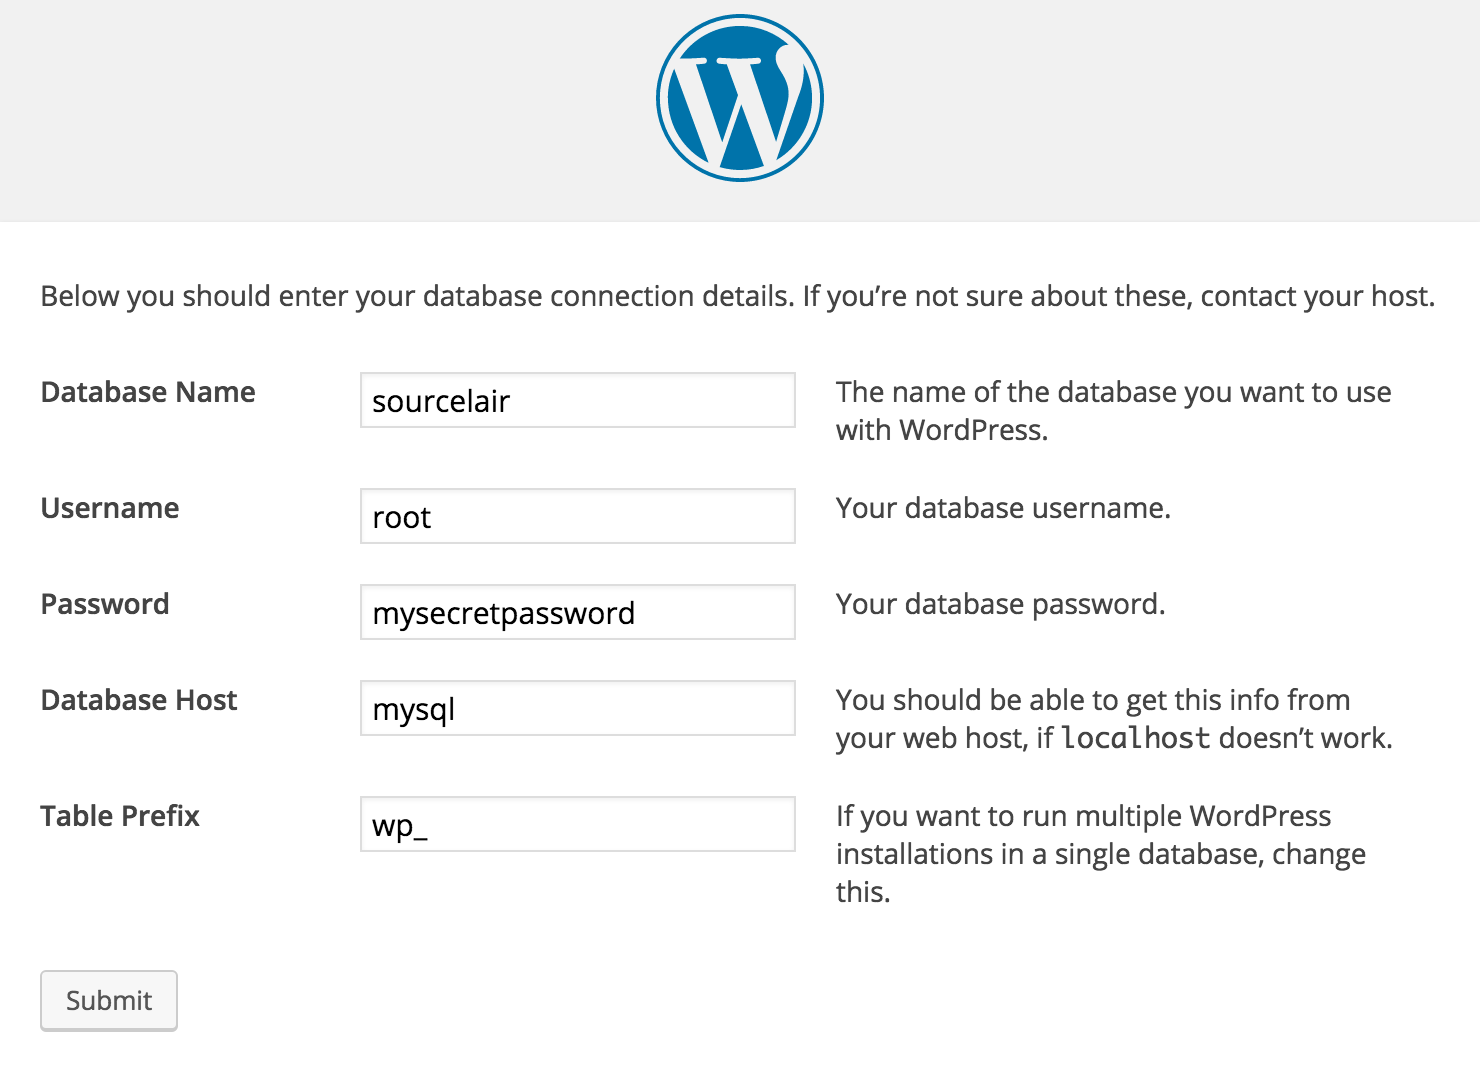
Voila! You are ready to install your WordPress following its default steps. In step 3, you are going to need some information concerning the database that you use, particularly:
- Database Name: sourcelair
- Username: root
- Password: mysecretpassword
- Database Host: mysql
- Table Prefix: wp_
Note: In case you have changed your password (following our MySQL help page), fill in your new password in the relative field.
Complete the rest steps, exactly as you would do locally and your WordPress platform will be ready for use anytime you want from your public URL.
phpMyAdmin
It is common for PHP developers to work with MySQL GUI tools like phpMyAdmin.
In order to install phpMyAdmin in SourceLair you have to follow the same process that you would follow if you developed locally. The only difference is the content of the config.inc.php file. Here is a brief guide for installing and configuring your phpMyAdmin to your MySQL in SourceLair.
Install and configure phpMyAdmin
- Connect a MySQL to your project as described in the previous step.
- Install phpMyAdmin inside the
wordpressdirectory with composer, following the instructions below:- Switch to the
wordpressdirectorycd wordpress - Install phpMyAdmin by running the following command:
composer create-project phpmyadmin/phpmyadmin --repository-url=https://www.phpmyadmin.net/packages.json --no-dev
- Switch to the
Create a
config.inc.phpfile inside your/phpmyadminfolder with the following content:<?php /* * Generated configuration file * Generated by: phpMyAdmin 4.5.4 setup script * Date: Fri, 29 Jan 2016 12:34:04 +0000 */ /* Servers configuration */ $i = 0; /* Server: sourcelair [1] */ $i++; $cfg['Servers'][$i]['verbose'] = 'sourcelair'; $cfg['Servers'][$i]['host'] = 'mysql'; $cfg['Servers'][$i]['port'] = ''; $cfg['Servers'][$i]['socket'] = ''; $cfg['Servers'][$i]['connect_type'] = 'tcp'; $cfg['Servers'][$i]['auth_type'] = 'cookie'; $cfg['Servers'][$i]['user'] = 'root'; $cfg['Servers'][$i]['password'] = ''; /* End of servers configuration */ $cfg['blowfish_secret'] = '56ab5b9bda6305.64858666'; $cfg['DefaultLang'] = 'en'; $cfg['ServerDefault'] = 1; $cfg['UploadDir'] = ''; $cfg['SaveDir'] = ''; ?>
That's it. Your phpMyAdmin is installed and configured to your MySQL. All you have to do now is go to <Public URL>/phpmyadmin (e.g. https://randomhex.apps.lair.io/phpmyadmin) and login with the same credentials you have for your MySQL database. You can find details about your default MySQL username and password here.
Tips to code faster
SourceLair provides you with some great features in order to help you develop faster your website being focused on the creative part of programming.
Auto-format
When you write your PHP, HTML or CSS files, SourceLair's editor automatically place your cursor at the correct indentation level so that you don't have to worry about it. Although, when you break down your format you can select the number of lines you want to "auto-format" and press Shift + Tab.
Command Palette
Command Palette is a free text search tool which helps you use most of SourceLair's features really fast. You can open it by pressing Ctrl/Cmd + Shift + P.
Quickopen
Quickopen is a fast and time saving way to navigate through your filesystem in order to find and open any file you want using your keyboard.
There are 2 ways to open the Quickopen prompt:
- using its shortcut Ctrl/Cmd + Shift + O
- finding the
Quickopen: Open a filecommand from Command Palette (Ctrl/Cmd + Shift + P)
Find in files
Find in files is a simple and easy way to search for something in your entire project at once, with quick file navigation from the results. There are 2 ways to trigger this feature:
- finding the
Project:Find in filescommand from Command Palette - using its shortcut Ctrl/Cmd + Shift + F
Deployment
WordPress code is tightly coupled with your MySQL database. Thus, you need to deploy both your code and your MySQL database.
Deploy your code
There are many ways to deploy your WordPress website's code, choose the one that fits your needs:
- Deploy your website with FTP
- Deploy your website using Heroku (coming soon)
Deploy your MySQL database
In order to deploy your MySQL database, you need either to be able to access your database remotely from SourceLair, have an administration panel for your MySQL database, or have SSH access to the server that is hosting your MySQL database.
With remote access
In such case, you will need to run the following commands to transfer your database from SourceLair to your remote MySQL database:
mysqldump -u root -h mysql -pmysecretpassword sourcelair | mysql -u <remote-user> -h <remote-host> -p<remote-password> <remote-database>
This command, will create a new dump of your database named "sourcelair" and will run this dump against the given remote database. Remember to replace <remote-*> parameters with the ones given by your MySQL provider.
With an administration panel, like PHPMyAdmin
First, you will need to create a MySQL dump of your SourceLair database:
mysqldump -u root -h mysql -pmysecretpassword sourcelair > dump.sql
Then, download this dump (which should have appeared in your SourceLair file explorer) by right clicking on it and clicking "Download".
Finally, upload this file to PHPMyAdmin.
With SSH access
First, you will need to create a MySQL dump of your SourceLair database:
mysqldump -u root -h mysql -pmysecretpassword sourcelair > dump.sql
Then, transfer this dump to your remote server using:
scp dump.sql <remote-user>@<remote-server-ip>:/tmp/dump.sql
Finally, SSH to your remote server and load the dump in your remote database:
ssh <remote-user>@<remote-server-ip> mysql <remote-database> < /tmp/dump.sql
Remember to replace <remote-*> parameters with the correct ones, according to your remote server.