
Introduction
Following this guide, you will be able to set up a professional Git workflow in order to create awesome websites. It is great for people who want to create websites and also improve their knowledge of Git.
Requirements:
- 15-20 minutes
- desire to learn
- $0
- feel free to ask Chris ([email protected]) anything you want
Set up Git
Git is one of the most important professional developers' tools. You can learn the basic about using Git here. We strongly suggest you to do it before you continue. We are going to use Github for our guide.
Github account part
- Sign up at github.com (or log in if you have already an account).
- Create a new repository.

SourceLair part
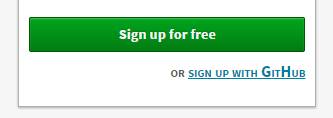
- Go to sourcelair.com and "Sign up with Github" (or "sign in with Github" if you have already an account).
- If you don't have any project, click on "Clone a repo". If you already have some projects, click on "start a new project" from the bar on your left.
- Click on "clone one of your Github repos".
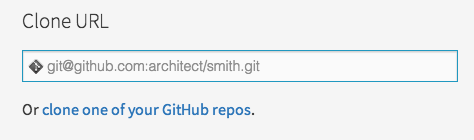
- Choose HTML/PHP as type of project and clone.
In case you cloned and you forgot to choose HTML/PHP as the type of project, you can delete your project and clone it again.
Next step, use Git with an HTML project.
First HTML project with Git
You have already connected your Git with SourceLair, let's do our first commands.
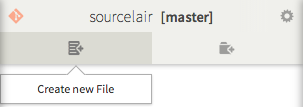
Create a file index.html
Create a new file "index.html" in your file explorer.
Write some code
Your index.html will open in your editor so write your code there and press "Save". Here is an example you can copy and paste:
<!doctype html>
<html>
    <head>
        <meta charset="utf8" />
        <title></title>
    </head>
    <body>
        <h1>Hello</h1>
        <p>That's my first html project at SourceLair and it seems cool.</p>
    </body>
</html>
You can also press "Preview File" or Ctrl+Enter in order to live preview your code.
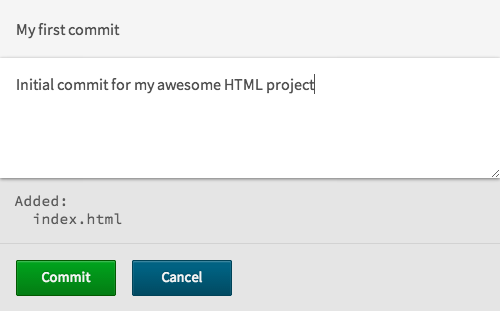
Commit
Open Command Palette and type "Commit".
Choose the "Source Control:Commit" option, fill in the necessary information (like below) and commit.
You probably noticed that the colour around the name of your file has changed. It happened because your file is not uncommited anymore (blue=commited). You can read more about visual status for Git here.
Push
Open Command Palette and type "push". Choose the "Source Control: Push" option.
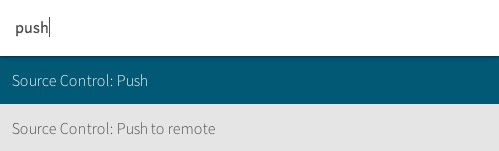
With "push" command you sent your code in your Github repository. So you have the latest version of your code saved there. If you go back to your Github account you will see that it is informed with your latest "push".
- Push: It will push your code to your default remote. As you clone your repo from Github your default remote is your Github account.
- Push to remote: It is used if you want to push to another remote, not your default.
Useful info: Don't forget commit is local, push is not local.
Next step, let's prepare your server.
Prepare your Server
In order to see a website in your browser there should be a server who serves this website to you. We are going to create and connect a server with our SourceLair account in order to manage our code through SourceLair instead of server's terminal.
You can use any server you want, in this guide we are going to use DigitalOcean's server.
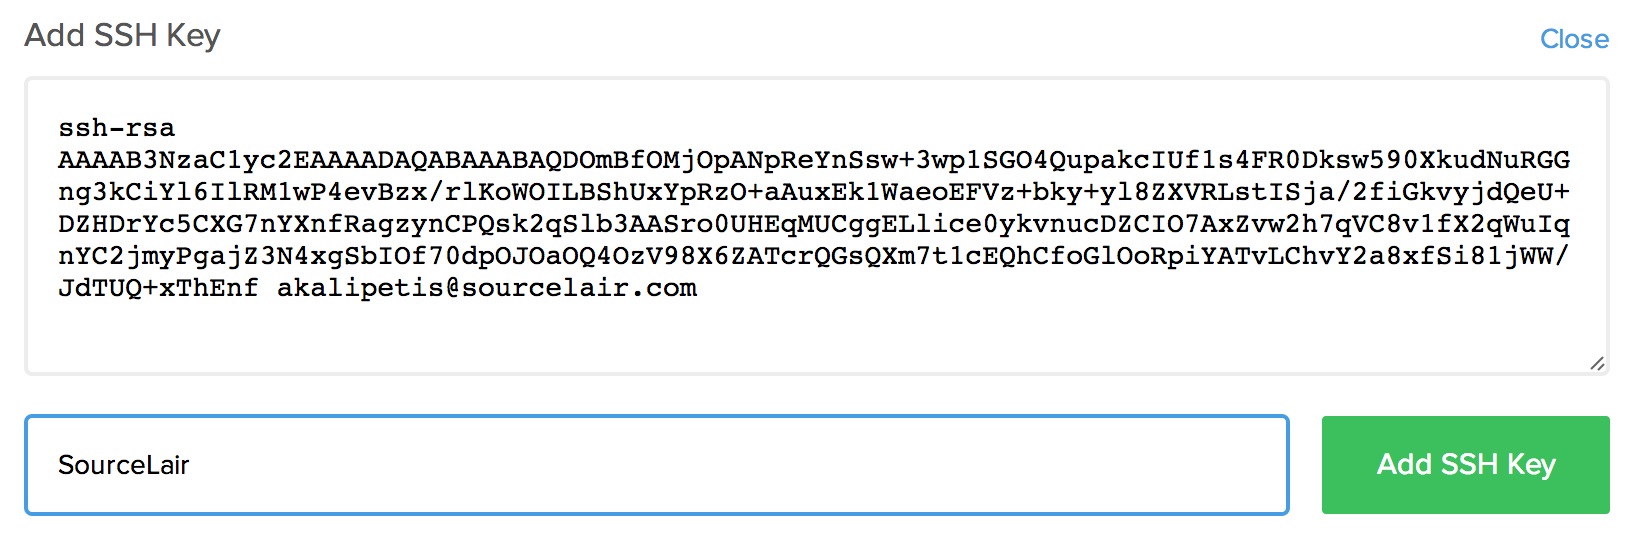
Copy your SSH keys
- Go to SourceLair and open your Account Settings (clicking on your gravatar in the up left corner).
- Copy your whole Public Key (we will use it soon).
DigitalOcean account & server
(Important: This is the only part that you will use your server so you can follow this guide with any Ubuntu server)
- Sign up or log in at digitalocean.com (Promo Code: WP10 = $10 for free )
- Create a Droplet. Droplet is actually your server. In case you need help you can check here. We propose these choices:
- Hostname: Anything you want
- Select Size: $5/month
- Select Region: Region of your server. Anything you want.
- Available Setting: None
- Select Image: Ubuntu 14.04 x64
- Important: Don't forget to add your SSH key clicking on "+add SSH key" and pasting your SourceLair public key (you have already copied it before):
Connect and Prepare
- Go to your SourceLair account and type in your terminal:
(You can always copy with Ctrl+C and paste at terminal with Ctrl+Shift+V)
ssh [email protected]
Where you replace 1.2.3.4 with the IP of your DigitalOcean server.
And you are connected to your server through SourceLair!
- Let's update our server
sudo apt-get update && sudo apt-get upgrade -y - Install apache2 and Git
Your server is ready!sudo apt-get update && sudo apt-get install -y git apache2
Next step, let's set up Git at your server.
Set up Git at your Server
Let's type some more commands in order to prepare our server for professional work. You have to type these commands at your SourceLair Terminal (being connected with ssh like in previous step - e.g. ssh [email protected]). Following commands work for every ubuntu server, we will use DigitalOcean for this example.
1. Put SourceLair public keys to DigitalOcean
curl https://keys.lair.io/username/install | bash
Don't forget to replace username with your username at SourceLair.
2. Create Git and site directories on your server
Go to your home directory
cd ~
and then create your directory there by running:
mkdir site.git
Instead of site you can use any name you want.
3. Initialize empty Git repository
We will initialize an empty Git repository in the site.git directory, by running
git init --bare site.git
4. Add a post-receive hook
Now we have to add a post receive hook, in order to deploy the latest pushed code to our DigitalOcean server. We will do this in two steps:
- Create the hook file (copy and paste it all, it is one command)
echo -e "#! /bin/sh\n\ git --work-tree=/var/www/html/ --git-dir=$HOME/site.git checkout -f" > site.git/hooks/post-receive - Make the hook file executable
chmod u+x site.git/hooks/post-receive
5. Add DigitalOcean remote
You have to add a new Git remote in order to be able to push your code to your DigitalOcean server. Open Command Palette (Ctrl+Shift+P), write "add", choose "add new remote" option and complete it like this:
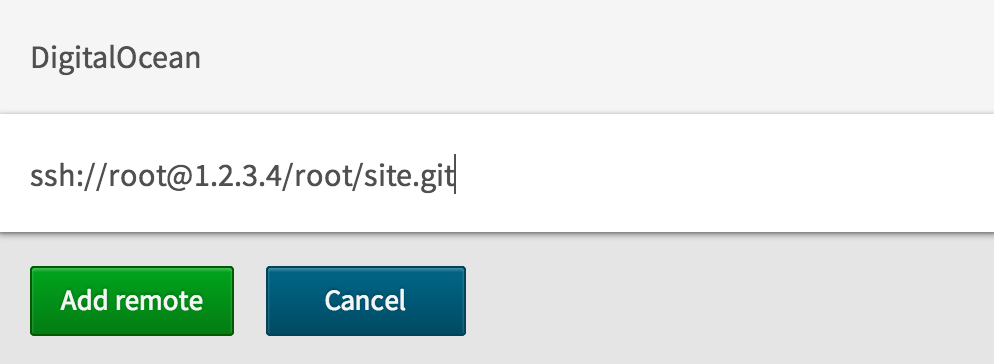
You should change:
- 1.2.3.4 to the IP of your DigitalOcean server
Useful info: There will be no interaction if everything is alright, so go on.
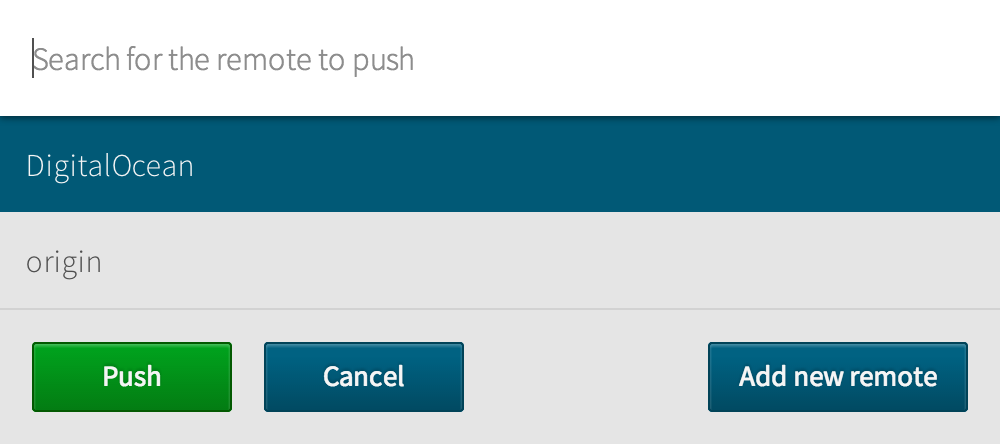
6. Push to DigitalOcean from SourceLair
You have to push your code to your DigitalOcean server. To do that choose the "Push to remote" command from Command Palette (search for it in free text) and then select the DigitalOcean remote that you created above.
7. Your website is public!
Go to your server's IP in your browser and enjoy your new website.

Let's go to Next Steps.
Next Steps
You have already connected your Github and your server with SourceLair. This is great because you can now work like a professional through SourceLair UI.
Working at SourceLair
After completing this guide, a good example of a workflow would be:
- Edit and save your code online.
- Test your code instantly with real-time preview.
- Showcase your work with SourceLair's Public URL.
- Commit your code from Command Palette.
- Push it to your Github repo from Command Palette.
- Push it to your server and so have your changes in public.
Work with team
Now, you can also easily cooperate with other people. All they have to do is clone your repo at SourceLair (following the same step as you did) and they will be able to commit, push and pull just like you.
Things to know
- You can do many more things using Git and the best way to learn is this guide.
- Your Github repository is public (upgrading your plan there allows you to create private).
- Your DigitalOcean server charge per hour. Your promo code covers your server's expenses for 2 months.
- You don't have to connect with ssh with your server again (except for advanced changes in your server)
- Your public URL stays always on.
- Chris([email protected]) would really love to hear your feedback, clarify if something was not clear or help you with anything else about starting web development.
Websites to start
- codecademy.com, if you want interactive learning.
- html5up.net, ready html5 templates (we have also a mini video here).
- There are many more if you search.